To create the same character across several images, start with one reference image and a short character sheet. Change the setting and action in each scene, while keeping the face, hairstyle, clothing, and accessories consistent. Then compare the results. That comparison matters just as much as the prompt: a character can look familiar and still end up with a different bag or an extra button.
Want a dedicated tool that trains a model on your own character images? Read our Scenario review.
For this guide, we created a series of five images featuring Lia, an original illustrated adult character. You can download the reference image, all five scenes, the generation requests, and a checklist, then use the same approach for your own character.
The test was conducted on October 3, 2026, using OpenAI’s built-in image-generation tool. Five separate images were generated from the same reference, followed by one targeted edit. These are still images, not a finished video. We did not test the Runway interface or assess consistency in animation.
What to prepare before generating scenes
Choose an original character or material you have permission to use. For a first exercise, start with one character, one outfit, and one style. Additional characters, changing outfits, and extreme lighting make it harder to identify what caused a change. If your character is based on a real person, make sure you have appropriate permission to use their likeness.
Create a folder with three sections: an approved reference, results still under review, and selected results. Give the files clear names. Save the prompt and generation date too, so you can tell which request produced each image. Do not rely solely on a chat history that may be hard to find later.
Check in advance that your chosen tool supports reference-image uploads or editing an existing image, and check your account’s quota and terms. Do not plan your schedule around the assumption that every attempt will succeed or be free.
Step 1: Write a character sheet you can check visually
A useful character sheet describes visible details, rather than just personality or backstory. “Curious and brave” may help with direction, but it does not define the shape of the glasses. Here is the character sheet we used:
- Identity: Lia, an illustrated adult woman aged about 28; an original fictional character.
- Face and hair: An oval face with a warm brown complexion, large brown eyes, thin round copper-colored glasses, a blue-black chin-length bob, and short straight bangs.
- Clothing: A mustard-yellow hooded raincoat with dark buttons, charcoal trousers, and dark teal ankle boots.
- Identifying accessory: A rust-orange crossbody bag with a black strap and dark buckle. The bag sits on the character’s right side, with the strap running from her left shoulder.
- Visual style: Storybook illustration with a warm painted texture, and no logo or text inside the image.
Define right and left from the character’s perspective, rather than the viewer’s. In a front view, her right side appears on the viewer’s left. Even with that definition, you still need to check the result: the words “the same bag” do not guarantee that its side or shape will stay consistent.
Step 2: Approve a reference image before starting the story
Our reference image shows front and profile views against a light background. This makes the face shape, coat length, and footwear visible. Choose an image in which identifying details are clear and are not hidden by hands, hair, or a large object. If the two views already differ, fix the reference before using it.
You can start with the request below. After receiving an image, review it and adjust the description to match what you actually approved.
Reference-image template (teaching version, not separately tested):
Create an original character sheet for an illustrated adult woman named Lia, aged about 28.
Show her full body twice: once from the front and once in profile, against a plain light background.
Keep the same identity, clothing, colors, and proportions in both views.
Character details: [paste the character sheet here].
Use soft, even lighting. No text, logo, additional character, or accessories I did not request.
Save the approved reference separately. Attach it again for every new scene. Chat memory and a written description may help, but neither replaces having the correct image available for the current request.
Step 3: Change only the scene
Use a consistent structure: what must stay the same, what changes, and how to frame the image. Below is a reusable teaching template; it was not separately tested. The full prompts actually used in our test are included in the download kit. They are longer and distinct from this teaching template.
Scene template (teaching version, not separately tested):
Use the attached image as the reference for Lia's identity and style.
Create one scene image, not a collage.
Preserve her face, glasses, hairstyle, body proportions,
yellow coat, trousers, ankle boots, and orange bag with its black strap.
The bag is on her right side, with the strap running from her left shoulder.
Change only the environment, action, camera angle, and lighting according to this description:
[short scene description].
Preserve the clothing colors even when the lighting changes.
No hat, scarf, jewelry, additional person, text, or logo.
In our test, each scene was generated separately from the same original reference. We did not use the most recently generated image as the sole reference for the next one. This makes deviations from the baseline easier to spot and helps avoid accidentally carrying a small change through the entire series. It was a workflow choice for this test, not a promise that every tool will produce the same result.
The five scenes we actually created
The series changes the setting, lighting, and action without changing the outfit. The contact sheet below shows the reference and the five selected results. The café image is the version after the correction described later.
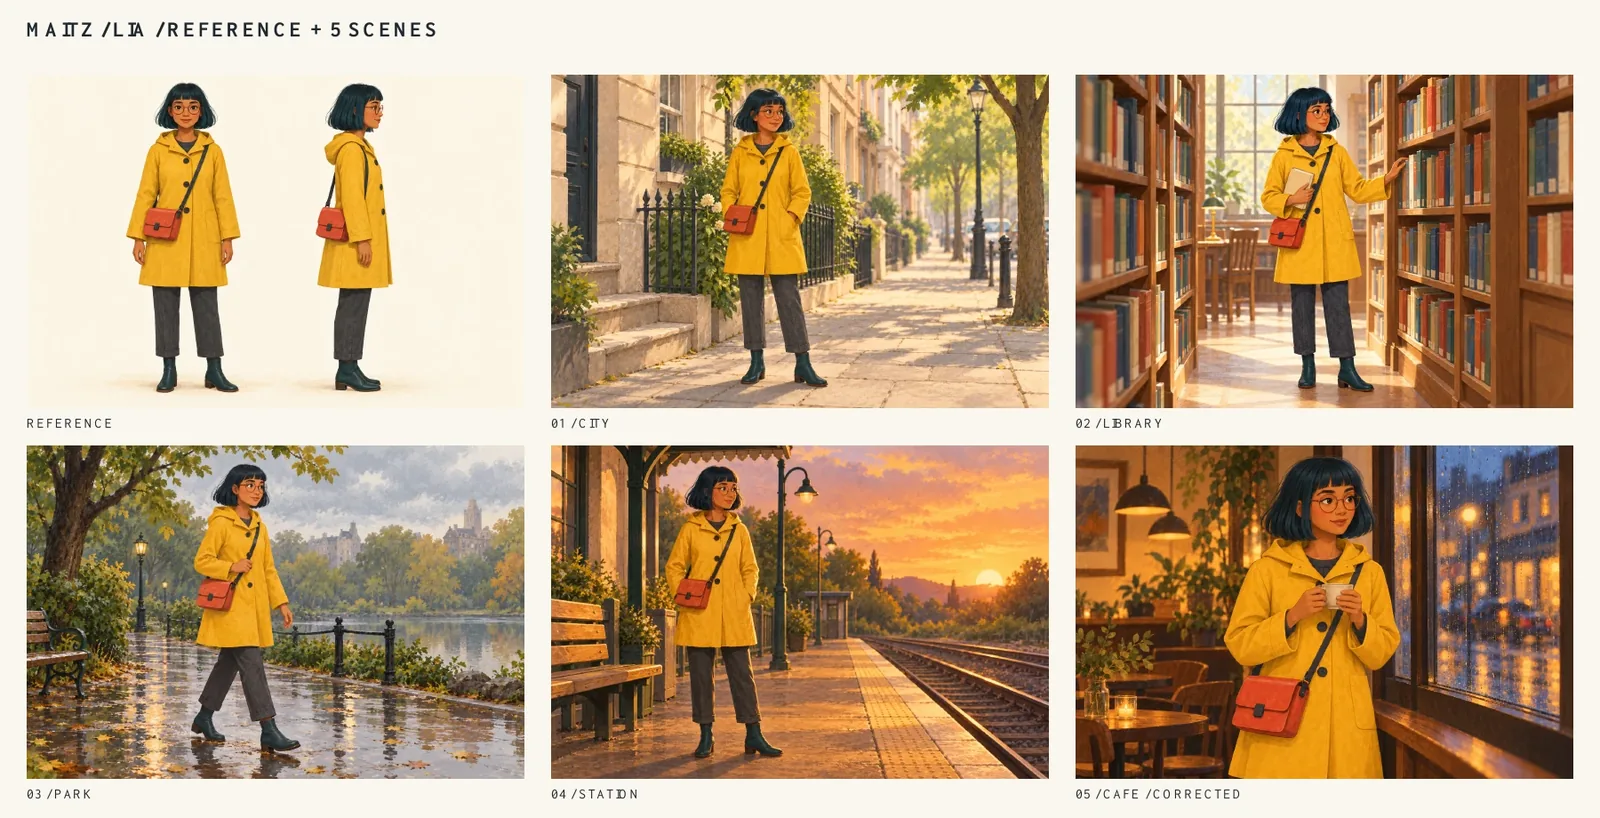
- A street in the morning: Lia stands on a quiet sidewalk in a full-body, three-quarter view. This result lets us check the coat, bag, trousers, and ankle boots together.
- A library: Lia stands between shelves, holding a small closed book. Here, we checked that adding an object in her hand did not replace the bag or hide most of her identifying details.
- A park after rain: Lia walks along a path under overcast light. Her pose changes, and her arm hides part of the coat’s front. Hidden details were marked as not assessable.
- A train station at sunset: Lia waits on a platform in warm light. The coat remains recognizably yellow even though its shading changes. This also illustrates why it is important to distinguish material color from lighting.
- A café in the evening: Lia appears in a relatively close view beside a window, holding a cup. Her glasses and hair remain recognizable, but a fourth button appeared on the coat. We corrected that deviation.
There are also deviations we did not correct: the coat looks shorter relative to the knees in the street and station scenes than it does in the reference, and the hair ends vary between images. We accepted these differences for a demonstration story; a production requiring a close match should correct them too. There is no automatic “consistency percentage” here. Visual comparison showed that the main identifying features were retained, alongside subtle differences in facial features and texture. The trousers and ankle boots are not visible in the café scene, so there is no basis for claiming they were checked there.
Step 4: Check the details instead of relying on an overall impression
Open the reference and all the results side by side. Start with the face, then check the hair, clothing, and accessories. Mark each detail as “preserved,” “needs correction,” or “not visible.” Do not mark shoes as correct in an image that shows only the upper body.
- Do the shape of the glasses and the bangs still match the reference?
- Have the coat, trousers, and ankle boots kept their color and cut?
- Is the bag still on the same side, with the same strap and fastening shape?
- Have any buttons, pockets, or accessories appeared or disappeared?
- Do the body proportions and style fit the same series?
- Does the image meet the scene request as well as preserving the character’s identity?
Small details can be missed in a wide shot, so zoom in on important areas in the full-size file. At the same time, review the entire series again at its intended viewing size. A tiny change in a detail the audience cannot see may be less urgent than an obvious difference in the face.
Step 5: Correct one deviation and check what else changed
The original café image had four dark buttons, compared with three on the front of the reference coat. We submitted an editing request with the café image as the target and the character sheet as an additional reference. Below is a short teaching version of that request, not separately tested. The exact request we used is included in the download kit:
Correction request (teaching version, not separately tested):
The café image has four dark buttons on the front of the coat.
Remove only the bottom button and fill its place with matching yellow fabric.
Leave the other three buttons in their positions.
Preserve the face, glasses, hair, hands, cup, bag and strap,
background, lighting, and framing. Do not add text or make any other change.
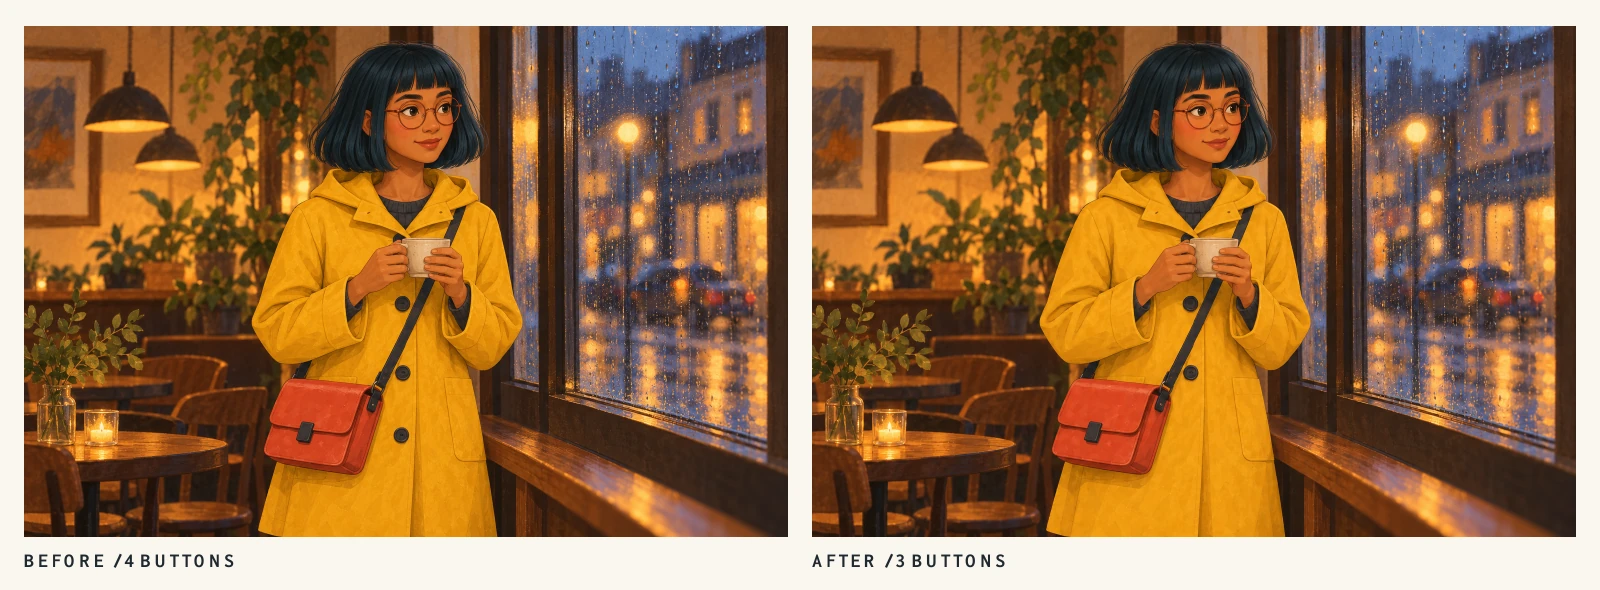
The bottom button was removed, and the other three remained. Our review also found slight rendering changes; we are not claiming that every other pixel was preserved. We therefore checked the face, bag, and hands again before selecting the version. The ChatGPT Images documentation explains that you can upload an image and request an edit, and warns that an edit may extend beyond the selected area.
Once the reference was ready, our round consisted of five scene-generation requests and one editing request. That is the request count for this demonstration, not a cost estimate or a guarantee of how many attempts you will need.
Download the practice kit
Download the Lia five-scene kit. It includes the reference, the five selected scenes, the café result before correction, a character sheet, the complete generation requests, and a checklist. Start with the first scene, check it, and only then continue. That gives you a chance to stop after an unwanted change before generating a whole series.
Frequently asked questions
Do I need to use exactly the same prompt every time?
Keep the identity and style description consistent, and change the scene description. Copying a prompt word for word does not guarantee visual identity. The reference image and review of the results remain essential.
Does this approach work in Runway too?
Runway documents the use of Gen-4 References to place a character in new scenes and refine results through corrections. You can adopt the character-sheet and review principles, but the examples here were created with OpenAI’s tool. We did not test whether results are equivalent across tools.
Can the five images be turned into a video?
They can serve as a starting point for a separate process. Animation introduces problems with movement, changing faces, and accessories disappearing between frames. To approve a video, you need to inspect the clips themselves; a consistent set of still images is not enough.
When is it better to start over?
If the face, hairstyle, and clothing have all changed, return to the reference and regenerate the scene with a simpler request. If the issue is an isolated detail, try a targeted edit and keep the original for comparison.
Official sources
- OpenAI: Creating and editing images in ChatGPT
- Runway: Working with reference images