To set up your first Grok Bot, pick one job that repeats in your work, give the bot a name and a description that holds its permanent rules, and start with a reading-and-preparation task where nothing goes out. Check the result, tell the bot what to remember, and only later turn the task into a skill or routine.
For current plans, prices and every Maitz article on Grok Bot, see our Grok Bot hub.
In short
- A good bot starts from one job that repeats in your work, not from a “general assistant.” Its description holds the permanent rules, and the chat holds today’s task.
- The first task should be reading and preparation only: an attached document, a defined summary, and nothing going out.
- Once the result is good, tell the bot explicitly what to remember for next time. Only later do you turn it into a skill or a routine.
Grok Bot, the agent app from SpaceXAI, is easy to install. The part where most people get stuck comes after: facing an empty chat window, not knowing what to ask for. This guide is a sequence of five short steps. By the end you’ll have a bot with a name, a role and a description, and one real result you’ve checked. Haven’t installed it yet? Start with How to download and install Grok Bot.
What do you need before you start?
- The desktop app and a suitable subscription. Grok Bot is included in certain Cursor and SuperGrok subscriptions. Details in How much does Grok Bot cost.
- One document to practice on. Meeting minutes, a procedure, a contract or a meeting summary. Preferably something non-sensitive, without customer details.
- Fifteen minutes without interruptions. The first time you sign in, the app sets up the cloud computer the bots work on in the background, and that can take a few minutes.
What do the first fifteen minutes look like?
| Minutes | What you do | What you should have at the end |
|---|---|---|
| 0-3 | Choose one job for the bot | One sentence describing the role |
| 3-6 | Create a bot and write its description | Name, label and description saved |
| 6-10 | Give a first task with a document | A summary you can check against the source |
| 10-13 | Check and correct | A list of mistakes, if any |
| 13-15 | Save a permanent preference | The bot knows how you want the result |
What role should you give your first bot?
According to the documentation, it’s worth creating a separate bot when a job has its own goal, its own tools and sources, a working style, an approval boundary or a fixed schedule. The opposite is a bot called “General Assistant.” The documentation states explicitly that a role like that gives the bot less direction and makes it harder to reuse what it has learned.
A question that helps you choose: what do you do every week that takes half an hour and can be checked by eye? For example:
- Summarizing meeting minutes and pulling out tasks
- Comparing price quotes that arrive in different formats
- Preparing a weekly roundup of news in your field
For the first bot we chose the first one, because it doesn’t need any account connections.
How do you create a bot, and what goes in the description?
The first time you sign in, the app shows a short explanation, asks which tools you use, and at the end suggests a few bots to choose from, in a step called Meet a future teammate. Your answers there only affect the suggestions; they don’t connect any tool. You can pick a suggestion or click Create your own.
When you want another bot later:
- Click New in the sidebar, or press
Cmd/Ctrl+N. - Choose Create new Bot, or type a name and choose Create “name” Bot.
- A bot called New Bot opens. In its menu, or under Edit Profile, set the name, label, description and picture.
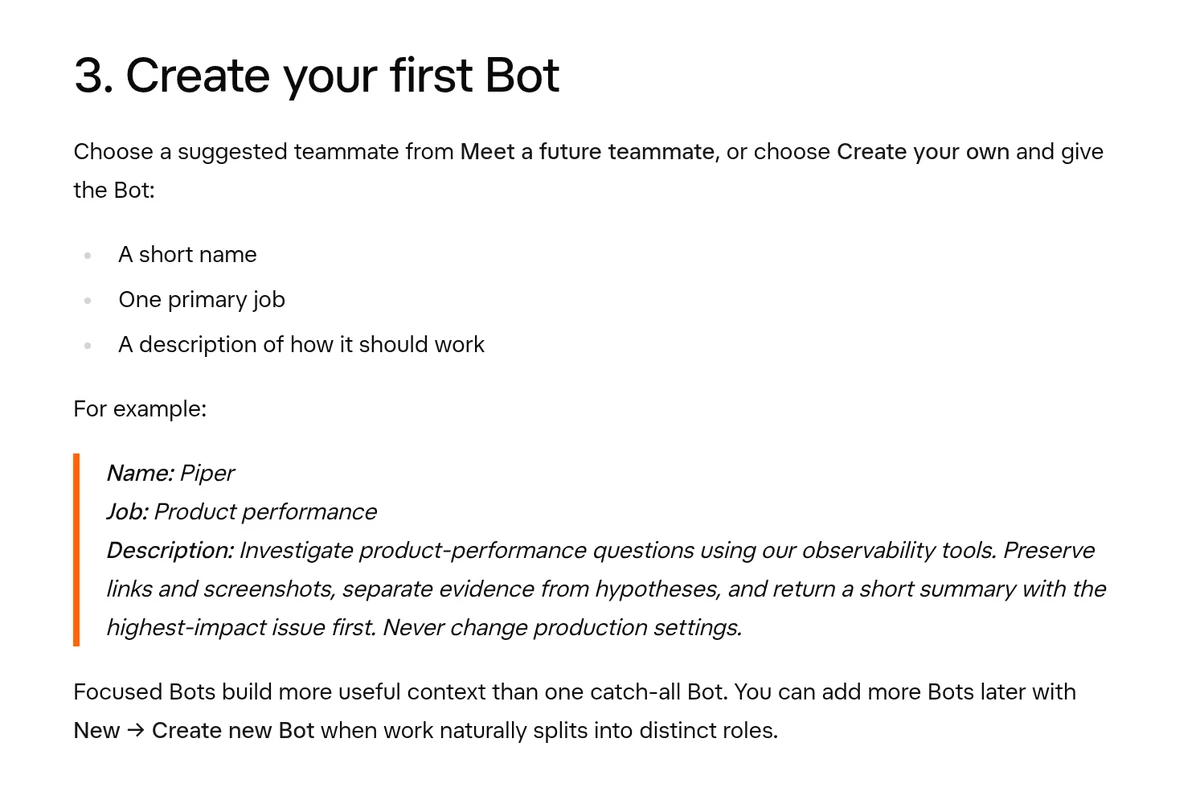
The name should be short. The label describes the job. The description is the important part: it’s what the bot always remembers, in every task. This is the description we wrote for our bot (translated into English):
Name: Dana
Label: Document summaries
Description: You summarize documents I attach: meeting minutes, procedures and contracts.
In every summary, separate decisions, dates and open questions, and next to each item write the clause number or heading.
When a detail is missing from the document, write "not stated" and don't fill it in from memory.
Write briefly and clearly.
Never change the original file, and never send or share anything without my approval.
Notice the split: what’s true for every task goes in the description, and what’s true only today goes in the chat. The documentation gives exactly this example: “don’t send messages without approval” belongs in the description, and “draft a follow-up for twelve customers” belongs in the message.
Before you start that first task, it helps to know how the free trial credit is metered and what can drain it quickly; see our Grok Bot free trial guide.
What’s the first task?
Attach the document with the attach button or by dragging it into the message box. You can attach up to six files per message. Then send:
I've attached the minutes of the building committee meeting.
Summarize them in five points.
Then add three separate sections: a table of dates, a list of decisions and a list of open questions.
Next to each item, write the clause number or heading.
Don't fill in a year, time or name that isn't in the document.
Return everything here in the chat and don't change the file.
The request follows the five elements the official getting-started guide recommends: what should be ready, what to work from, what’s off limits, what form to return it in, and when to stop. It also doesn’t require any connection or site login, so it’s a good fit for a first try.
How do you check the result?
Don’t settle for “looks good.” Open the document next to the summary and check four things:
- Does every date in the document appear in the table?
- Is there a decision the bot made up? Sometimes a recommendation from a discussion becomes “decided” in the summary.
- Are the open questions really open? If the document doesn’t say who’s responsible, the summary shouldn’t either.
- Are the clause numbers correct? Pick two and check.
How do you teach the bot what you like?
If something about the format doesn’t work for you, don’t fix it quietly. Tell the bot what to change, and set it as a permanent preference:
From now on, in every summary: the date table comes first, followed by the decisions.
At the end, list the open questions, and next to each one who needs to decide, if the document says.
Once the process is stable, you can ask the bot to save it as a skill, and then consider a routine. More on that in our routines guide. One more useful thing: in the bot’s settings (Bot settings) you can turn on Notifications, so you get an alert when it finishes or is waiting for you.
What do you do when an approval card pops up?
Even with a bot that only summarizes, it’s worth knowing the approval card before it appears. When the bot wants to take an action that needs approval, a card appears in the chat with the proposed action and three options: Allow once for this time only, Always allow, which saves a rule for next time, and Deny, which blocks it. At first it’s better to choose Allow once, until you understand how the bot works. If it’s not clear what the action does, ask the bot to explain it in plain words before you approve. More on these boundaries in our privacy and security guide.
Which mistakes should you avoid?
- A first task that’s too big. “Sort out all my email” sounds tempting, but it’s hard to check and uses up a lot of your weekly allowance. One document with a defined result teaches you much more.
- Permanent rules in the chat. If you wrote “don’t send” only in a message, it applies only to that conversation. A rule that should stick belongs in the description.
- A password inside a message. When a bot needs to sign in to a site, it should hand you control of its computer, and you type it yourself. The documentation asks you not to paste passwords or verification codes into the chat.
How did we test?
On October 3, 2026, we ran the first-task request and the correction request in Grok Bot, in a right-to-left language, on made-up minutes of a building committee meeting with four clauses. We checked the description as text, without creating a new bot in the account.
Testing changed the prompt twice. In the first version we asked for “page or clause,” and in a document without page numbers every item got “page 1.” Now it says “clause number or heading.” We also added the line “don’t fill in a year, time or name,” because the document had a date without a year.
Sample output (translated into English): “Open questions: window cleaning once a month? (clause 1). Who will draft the reminder? (clause 3).” The bot didn’t invent an owner for the reminder, which is exactly what we wanted to check.
FAQ
How many bots should I create at first?
One. According to the documentation, it’s better to start with the smallest team that gets the job done, and add a bot only when there’s a permanent role that justifies it. For role ideas, see 15 Grok Bot ideas.
What’s the difference between hiding and deleting a bot?
Hide from sidebar only removes the bot from the list. It keeps working, including its routines. Deleting removes its profile, conversation and routines, but files and logins on the shared computer may remain.
Can I write to the bot in languages other than English?
Yes. We tested this in detail in a language other than English; see our Grok Bot language support guide.
Does the bot keep working when I close my computer?
Yes. The work runs on the cloud computer, so closing the app or your laptop doesn’t stop it.
Sources
- Grok Bot Docs: Get started
- Grok Bot Docs: Creating and managing bots
- Grok Bot Docs: Messages and collaboration
- Grok Bot Docs: Approvals, security and privacy
- Grok Bot Docs: Settings and notifications
- Grok Bot Docs: Use cases
- Cursor Help: Grok Bot Onboarding
The capabilities mentioned here were checked against the official documentation on October 3, 2026.